Eyelet Wrist Warmer Knitting Pattern

After the success of my eyelet messy bun hat pattern, I’m please to bring you my latest pattern! The eyelet wrist warmers coordinate with the messy bun hat, and the set would make a super cute gift this holiday season. The pattern includes adult, toddler and child sizes. Knit up in worsted weight yarn, they are a quick and satisfying project! The pattern is available for download from Ravelry. Thank you for your patronage!


Size 2-4

Size 6-10

Size 6-10


Eyelet Messy Bun Hat Pattern

DSC_0233

My Eylet Messy Bun Hat Pattern is now available as a download from my Ravelry store! The pattern is $5 CND, which is just over $3.50 USD, and comes in 3 sizes and 2 styles. Your patronage of my store is a huge blessing to our family of eight. Thank you so much!

I’ve also created a pattern for a pair of wrist warmers that match the eyelet messy bun hat! The pattern can be found at my Ravelry store.
DSC_0272

Eyelet Wrist Warmers

Colour Block Mittens

Colour Block Mittens

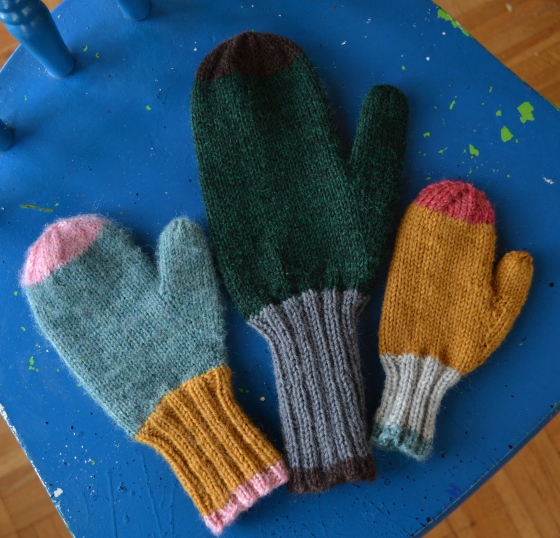
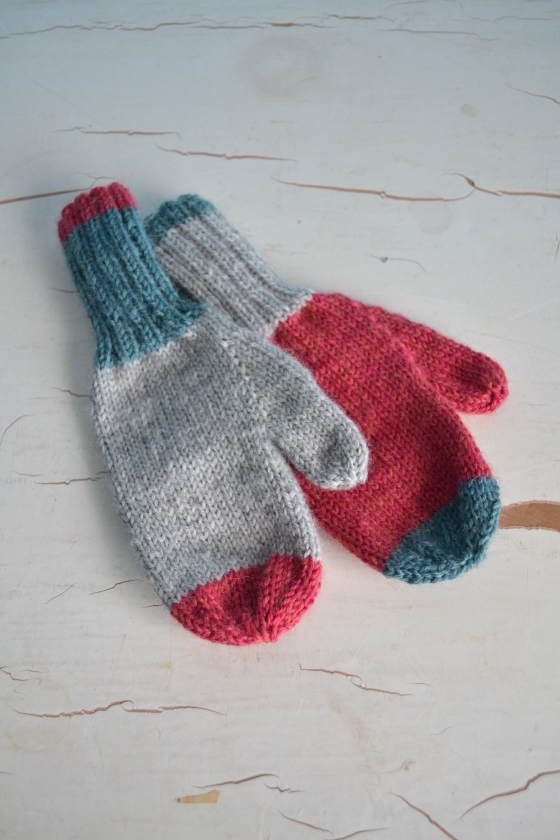
Cute and colourful, these mittens in 3 different sizes are a great way to use up those yarn ends! I designed them to have a long cuff to keep wrists nice and warm.

Size: Small (2-3), Medium (4-6), Large (7-10)

Yarn: 3, 50 gram skiens of sport weight yarn in contrasting colours. I used Knit Picks Wool of the Andes Sport.

Needles: 2.75mm and 3mm double pointed needles

Pattern notes: To avoid jogs when changing colours, use the jogless stripes method.

To avoid gaps at the base of the thumb when picking up stitches, pick up a couple of extra stitches and then knit them together on your first round.

Cuff band and mitten tip will be referred to as colour 1, cuff will be colour 2, and the main mitten and thumb will be colour 3.

-with colour 1, cast on 28 (36) (44) sts using a 3mm straight needle (or 2 2.75mm needles held together). Divide onto 3 2.75mm dpn. k in the round using k2, p2 ribbing for 3 rounds.

-switch to colour 2 and continue ribbing until cuff measures 2″ (3″) (4″).

-using 3mm dpn’s and yarn colour 3, work in St st, increasing 3 sts evenly across 3 needles. You will now have 31 sts (39) (47).

-k 1 (2) (3) rows.

Set up row for the thumb gusset: k across 1st needle, k across 2nd needle until 1 st remains. pm. k last st on 2nd needle. On 3rd needle, k 1 st. Make one st (yo), pm, k across the rest of 3rd needle.

Next 2 rounds: k across

Now repeat the following rounds until you have 9 (11) (13) sts between the markers.

Round 1: k across 1st needle, k across second needle until marker, slip marker and increase one st after marker (yo), k until 2nd marker, increase one stitch before marker (yo), slip marker, k across the rest of 3rd needle.

Round 2 & 3: k across (k through the back of the loops of increased sts to avoid holes)

-when you have the required amount of stitches, place thumb gusset sts on scrap yarn.

-continue knitting in St st until mitten (not including the cuff) measures 3″ (4″) (5″).

-switch to colour 1 and k for 3 (4) (5) rows.

Decrease:

-*k3, k2 tog* repeat around from *
-work 1 round plain
-*k2, k2 tog* repeat around from *
-work 1 round plain
-*k1, k2 tog* repeat around from *
-*k2 tog* repeat around from *
-break yarn and pull through all remaining sts

Thumb:

-place sts on 2 3mm dpn’s
-pick up 2 (3) (3) sts
-k until thumb measures 1.25″ (1.5″) (2″)
-break yarn and pull though remaining sts

Finishing:
-weave in all loose ends

(please comment if I have made any errors, and I will fix them!)

DSC_0225

The Erika Cowl

DSC_0131 DSC_0142 DSC_0144 DSC_0145


I’ve been busy knitting up a storm this holiday season. I wanted to make a chunky cowl for my friend Erika, but lacked the large, circular needles that the pattern called for. So what’s a girl to do but make up her own pattern! I’m a bit embarrassed to call it a pattern as the instructions are so simple. But here goes.


The Erika Cowl

Finished size aprox. 12″ deep x 29 long

Materials:

1 skien Knit Picks Wool of the Andes Bulky in Crush (137 yards) or other bulky weight yarn

Size 12mm straight needles

5- 1″ diameter buttons

Instructions:

Cast on 30 sts. Knit in seed stitch for desired length. Make sure to leave enough yarn for the button hole row, and to bind off.

Buttonhole row and finishing:

K2 in seed stitch pattern, * yo, k2tog, k4 in pattern* repeat from * until 2 sts remain. k2 in pattern.

Knit two rows in seed stitch pattern. Loosely bind off in seed stitch pattern.

Weave in ends and block if desired. Sew the buttons on.


Free Pattern: Voile Pajama’s

P.j's

Cuff
Bow

This past summer I bought some Anna Maria Horner voile that was on sale at Huggeligt. The fabric sat in my stash until a couple of weeks ago, because as gorgeous as the fabric is, I couldn’t think of what to do with it. I love colour, but the print is a little louder than I usually wear. I spotted a free pattern for pyjama’s on the Advantages Magazine website. Voile pyjama’s? Oh yes! These loungers from Anthropologie served as the inspiration for the wide contrast cuff. I nixed the pyjama top, and opted to use a tank I have that just happened to be the perfect match.

Some pattern notes; I sewed the size 40 pant, but I found that I needed to add an extra 1/2 ease in the thigh area. I usually wear a size 8 bottoms. Luckily I had the foresight to sew up a muslin of the pants, using some cotton that I had put aside for such a purpose. I know that it is an extra step, but I highly recommend sewing up a muslin, especially if you are using special fabric. There is nothing worse than making something that doesn’t fit right! I added a 6″ cuff to the bottom and a bow to the waist using contrasting fabric.

There is a nice DIY for a pair of shirred voile p.j pant bottoms at Noodlehead. I may have to make these, as I am now a little addicted to sewing with voile!